Monday, May 4, 2009
Oops...an apology
So sorry to all my loyal followers =) I'm sorry I have not posted any awesome crafts for months now. For one I found out I was pregnant and got a little distracted to do crafts. Then we went on vacation for a couple weeks and I just never got back into the swing of things. But I will!! Nate has been begging me to, so I'll be back!
Saturday, January 31, 2009
Friday, January 30, 2009
Balancing Butterfly
What we used:
Cardboard
2 coins
tape
scissors
What we did:
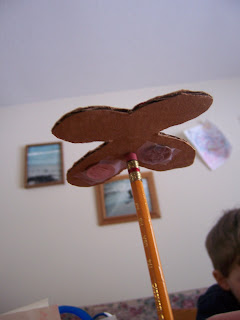
Fold a paper in half and trace half a butterfly. Make sure the bottom wing is larger and hangs lower than the top. Cut it out. Then trace on cardboard and cut out. Color the butterfly. Tape a coin on each of the bottom wings. You may have to play with them to make sure it is even. Balance the butterfly on a pencil, finger, even your nose.
Thursday, January 29, 2009
Guitar
Wednesday, January 28, 2009
Fingerpaint
What we used:
To make the paint...
1 cup flour
2 TB salt
1 1/2 cups cold water
1 1/4 cups hot water
food coloring
Combine in a pot, cold water, salt, flour, beat with a whisk.
Heat at medium and then slowly stir in hot water.
Keep stirring until it thickens.
Remove from heat.
Beat until smooth with a whisk.
Divide into small bowls and add food coloring.
When cool, PAINT!
Tuesday, January 20, 2009
Obstacle course
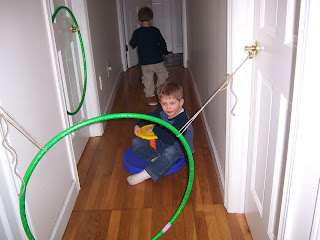
We made an obstacle course today. This occupied the boys for hours!
We used random items we found around the house:
small chair
yoga blocks
bucket
stool
floor mat
hula hoop and twine to tie it up
sit and spin
circle shapes
an edge to a rubber mat (straight line)
They started by running circles around the chair and then the bucket. Balance on the yoga blocks and then up and over the stool. Mats were set up on the other side so they could jump off. Jump through the hula hoop. Spin on the sit and spin. Step on each circle and then balance on the straight line. Jump off the end of the line over the edge of the hallway and you're done!
This was great. They want to do another one tomorrow! You can could use anything. Anything you can step on, climb on, crawl under, jump over, run around, balance on. I was thinking couch cushions would be great....maybe we'll use those today. This is fun and great exercise. Great for winter days when it's too cold to play outside!
Monday, January 19, 2009
Keepsake boxes
So sorry to be MIA! Spent the week with the kids rotating a stomach virus between them, and my husband. Ick! Luckily I made it through healthy, it's never good when mom is sick!
What we used:
What we used:
box
construction paper
scissors
glitter
glue
puffy craft balls (no idea what they are really called)
Optional: Anything small that could glue to the box. We were going to use beads, but I was afraid the glue wouldn't keep them stuck forever, and with a one year old that would pick them off and eat them....yeah, didn't use them.
Paint: we didnt use paint, but you totally could.
What we did:
We started with cutting out a bunch of shapes out of the construction paper. We (and I mean everyone, this was a great craft for everyone) glued the paper and the balls to the box (and you can glue whatever else you want to use) After they were done gluing I wrote their name with glue on the side (good for name recognition and learning to read) and they covered it with glitter.
This (semi) finished product
(the boys want to add more on, and we will, just not today)
Tuesday, January 13, 2009
Saturday, January 10, 2009
Friday, January 9, 2009
Snowflakes
What we used:
Paper
Scissors
That's it!
Fold paper in half each way a few times (the more folds the more "holes", but the paper does get tough to cut, think about that if you have little ones cutting) Make an assortment of triangles, half circles, squares, etc around each edge. Make sure to leave a little space between each shape so your paper has something to keep it together! Unfold and reveal your beautiful snowflake.
Thursday, January 8, 2009
Coffee Sculptures
What we used:
Equal parts:
Ground coffee
Flour
Salt
Water
(I used 2 cups of each but we ended up with way too much poop colored clay, So start with 1 cup each if you want)
Mix it all together. Add the water last a little at a time to make sure you get a good consistency. After sculptures are done, they can either air dry or put them in the oven for an hour or so at 200 degrees. I noticed the taller ones started to slump over and I had to fix them a few times before they hardened. This was fun and cheap, and the boys could mix it all up themselves. But be warned it does come out looking like poop! haha
Wednesday, January 7, 2009
Tuesday, January 6, 2009
Noise makers
What we used:
2 cups
Assortment of rice, beans, pasta, etc (different sizes and shapes for the sound)
Electrical tape
Stickers to decorate
Fill one cup with a handful of assorted items. Place the second cup on top and tape together. Decorate! If you use paper cups you could paint it or use markers. We used plastic, so we used stickers. Shake it all around. Great for parties or sporting events!
Monday, January 5, 2009
Pom Poms
Sunday, January 4, 2009
Air freshener ball
What we used:
Orange
Cloves
Ribbon
Cinnamon (optional)
I know this has a name, but I don't know what it is. So it's an air freshener ball =)
Cover the orange with the cloves. Optional: sprinkle cinnamon all over it. Then tie ribbon around vertically and horizontally, leaving enough for a loop to hang from. Eventually the orange will harden. I'm told this will last for years....but this is the first time I've done this, so I'll let you know in a few years ;)
Saturday, January 3, 2009
Snowman Family
Subscribe to:
Posts (Atom)